

In our kitchen we have a couple of water filter units. The kind that you fill up the top of and the water slowly filters through a ceramic filter (called a ‘low pressure candle’) and into the bottom section, where you pour the water into your cup through a tap.
I like to replace the candles at least every year. That’s a guaranteed change, Sometimes, like after this hot Summer of bushfires, when the tap water quality wasn’t that great, I change them more often. I do clean them occasionally, scrubbing off the dirty, outer layer but there’s only so many times you can do that.
I got to thinking that they must still have a function as a filter and maybe the colloidal silver that kill bacteria and the activated carbon that acts to remove organic chemicals inside candle are still useful. The question was how to reuse them or at least extend their lives?
Cleaning them didn’t seem to make much of a difference to their flow rate or the colour of the water they allowed through. That told me that they still had a life ahead of them.
I decided to make a bulk filter for rainwater or tap water for use around the garden and for an emergency filtration unit if times got tough.

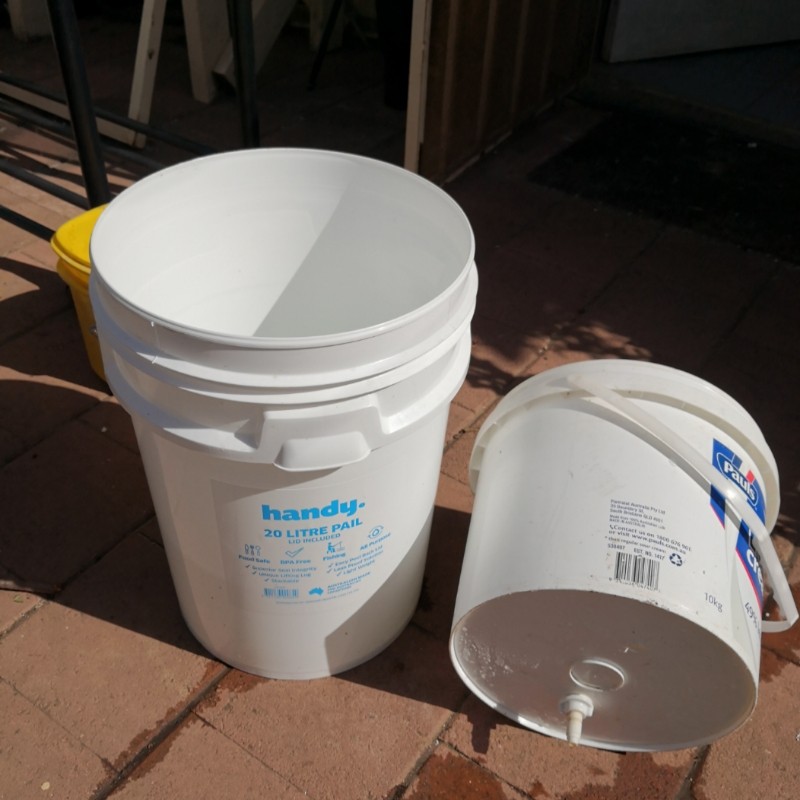
The solution was this dual filter, dual bucket method that I will show you.
The bucket size is important, though you can play around with your own design. Most things I design have a high degree of flexibility to them.
The bottom bucket should be the largest. This receives the water and you can refill the smaller bucket a couple of times to fill it. I use a 20 kilo bucket for this, the kind that tilers use. You can fit an optional tap to this to allow it to drain but I haven’t because we use it on the floor. You may want to raise your setup up off of the ground. I left ours low so that Jelina doesn’t have to raise containers of water too high. She has a bad back and RSI in her wrist so this is important.

I use a 10 kilo bucket as the top. A bucket of this size holds about litres of water. This size allows the ring around the rim to fit snugly against the rim of the bottom bucket. There are several slightly different shapes available for this size and I chose the one that I did because its base doesn’t reach too far down into the bottom bucket giving a larger reservoir capable of being filled that means fewer changes and less work.


We use standard Stefani brand ceramic filters around the house. They are very common and any hardware store around here stocks them. They are about $22 each, so you can see why I wanted to find a way to extend their useful life.
The filter setup consists of the ceramic shell with a silver compound contained inside it. Unless you break the shell, you won’t be able to access this compund and there’s no real need,water filters through it anyway.
Along with this is a threaded pipe that comes out of the base of the shell, two rubber or silicon sealing rings and a locking nut.

To use, you put a sealing ring over the pipe and slide the pipe through a hole in your container. The seal seals the top. Slide the other ring over the pipe and push it up until it presses against the base of your container. Then thread on the locking nut, turning it until it is pressed firmly against the seal, pressing it tightly.

It is possible to turn the thread too hard too break the pipe away from the ceramic shell. I tried with an old filter and it does take an excessive amount of tightening to do that. The lock nut actually doesn’t have to be too tight. A firm pressure against both seals is all that’s needed.
To make the unit, simply drill one or two holes in the bottom of the bucket that is going to be the top. The number of holes will depend on the number of filters you have. I had 2 handy so I used two, though I can comfortably add another two later in the space remaining.

You install the filter into the bucket in the same way as you would install a new filter into your water filter unit.
Slide the pipe from the filter through the hole, ensuring both seals are in place, fit and tighten the lock nuts and there you go. It is the seals fitting firmly against the plastic that seals water tight, so you don’t need an enormous amount of pressure. You can actually get away with using just one sealing ring, as long as you put it inside the top bucket. Just don’t tighten it too much.
That’s it, you now put the top bucket into the top of the bottom bucket and fill it with water, put the cover on to keep bugs and dust out and wait while the water filters through into the bottom bucket. The amount of time it takes to filter water in the top bucket through to the bottom will depend on the condition of your filter(s) and the number of filters you are using. I just fill the top bucket and leave until the next day.
You now have a bulk or emergency water filter from reused parts.
If you want to take things a little further, I suppose you could drill a hole into the top of the ceramic shell and replace the silver compound with more of the same or even activated charcoal. Seal the hole with silicon. I’m not sure if the stuff inside ever breaks down, but I suppose it would.
It may be wise to add some kind of support for the top bucket. I haven’t needed to so far but…
