

Just a note before we start. We don’t raise mealworms anymore. The chooks have so much other healthy, nutritious food that we decided that we would stop tje mealworms. It’s just one less thing to kill on a daily basis, one less weekly maintenance task and one less thing (bran) that we need to buy.
Saying that, they were a great addition to the diet of the girls and good fun to raise, so if you feel the urge, this info will be for you.
Mealworms (Mealworm Beetle, Tenebrio molitor, Darkling Beetle) are an easy to raise source of protein and other nutrients to feed to people, chickens or lizards. They are easy to breed and raise and this breeder design helps make then process even easier and tidier.
This is a design that was is fairly common on Youtube and it works well. There’s little waste and hardly anything that can go off in this breeder. Everything besides the plastic structure can be either composted, put straight onto the garden or, even better, fed to chickens.

Making the Tower
A semi-automatic Mealworm breeding and harvesting thingy can be easily made from a set of plastic drawers from a ‘cheap’ shop and by following these instructions:
All you’ll need is –
- Plastic drawer set
- Drill
- Knife
- Metal mesh
- Silicone or Hot Glue
- Bran
- Vegetable scraps
- Egg carton
- Net fabric
- Sieve

The roll-away drawer units come in various models and colours. Some of them have transparent drawers, those are no good because the Darkling Beetles prefer to be out of the light throughout their whole lifecycle. The name’s a dead giveaway!
Some models of drawers have different sized drawers. If you use one of this type, use the shallowest drawer for the pupae (see later in this instructional).

Step 1: Drill some ventilation holes on every side, near to the top of each drawer.

Step 2: Cut the middle out of the bottom of the top drawer. Leave a couple of centimetres around the edges.

If you cut too close to the edges and will be using soft mesh, so I put a plastic strip across the middle of the hole for a bit more support.

Step 3: Cut and place the metal mesh in the bottom of the drawer and either hot glue or silicon around the edges to hold it in position. Leave the glue or Silicone to cure until hard. Make sure that it goes right to the edge and that you get a good seal, maybe go over it a couple of times. They can eat through it if it’s your sealant is very thin.
Don’t use plastic mesh. They beetles will eat their way through it.
Don’t put 2 layers of mesh. The frass will get stuck in between them, making cleaning difficult. My first attempt at a tower used 2 layers ‘just in case’ and that was a disaster!

Step 4: Place a couple of centimetres of bran or oats into each drawer and replace the top drawer in the rack.
Don’t add too much bran to the top drawer because you want the beetles to be in close proximity to each other for romance, otherwise you won’t get any eggs.

Step 5: Put the egg carton and some of the vegetable slices in the top drawer.
Step 6: Cover the tower with a mesh fabric to exclude moths. Old curtain nets are the best as they’re probably going to be free or you can use mozzie nets.
To finish, add your Mealworms, beetles or pupae to the appropriate drawer.

How does it work?
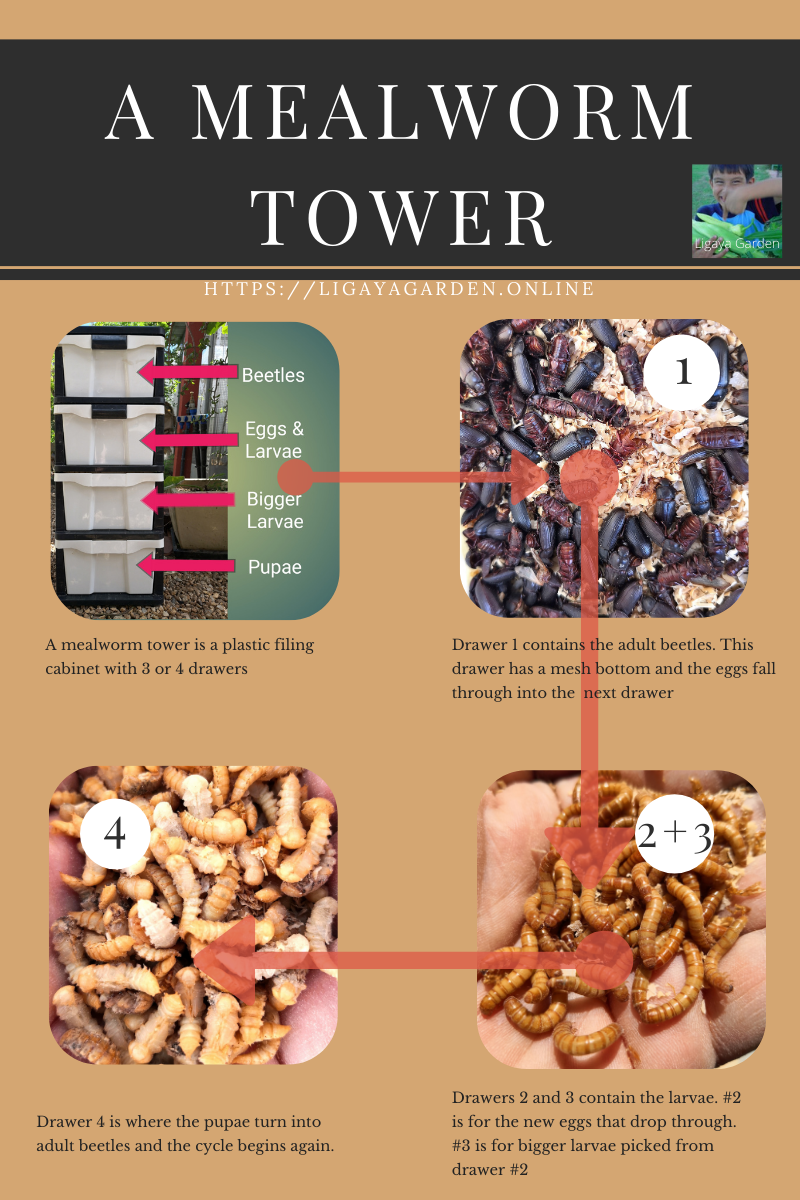
The system works from the top drawer downwards and back up again, in a cycle.
The top drawer is where the beetles go. They mate and burrow into the bran to lay their eggs at the bottom the drawer. With movement and time, these eggs and some recently hatched baby worms will drop through the mesh into the next level.
The second drawer is where the eggs hatch and the new larvae grow. Once you can easily see them, move them to the third drawer.
In the third drawer, the larvae get bigger and bigger. These are the “Mealworms” we are after. In a short period of time, these larvae will change into pupae. These you pick out and put in the fourth drawer.
The pupae hatch into adult beetles in the fourth drawer. These are picked out and put into the top drawer where the cycle repeats itself.
Mealworms eat the bran that they live in. The vegetable pieces only provide moisture for them to ‘drink’. Keep these changed at least weekly to prevent spoilage of the bran and mold.
You only need to put a couple of vegetable pieces in the bottom tray because the pupae don’t eat or drink. The moisture is for the beetles that will hatch from the pupae in between your maintenance sessions.
The egg carton gives the beetles a place to hide and a place to climb on. I’m not sure why they need to climb though, I’ve just seen it mentioned in a few places. Think of it as a playground and Love Hotel!
Keep the tower somewhere where the temperature is constant and not extreme. In the very cold weather, the insects slow down, and don’t eat or matye as much. The Darkling Beetle prefers darkness or low light throughout its whole life cycle.
Maintenance
Maintenance of this system is pretty simple. At least once a week, check that there is plenty of fresh vegetable material in each drawer. Remove any old dry or shrivelled stuff and add fresh if necessary. Check the old scraps for green mold and remove if you see it along with a little if the bran from its immediate vicinity.

Check for interlopers such as moths and other visitors. Squish them by hand if you see them and make sure that your netting is covering the tower on all sides and is reaching to the floor.
Pick out anyone who is in the wrong drawer and put them in their appropriate home. Check the second drawer for visible mealworms. At the early stages, you won’t be able to see them with your naked eye but there is a trick for showing if they are present in numbers. You simply draw your finger across the bran and wit a second or two. The bran will start to shift and move on its own. This is due to the movement of hundreds of baby mealworms that you have disturbed with your finger.

Sieve each layer to separate the frass (see later in this instructional for an explanation of what that is) from the insects, vegetable material and remaining bran. Put the frass to one side as it is valuable stuff. Don’t sieve the second drawer too often. This drawer contains eggs that have fallen through the mesh from the first drawer. You’ll have to let it build up there until you can see baby mealworms and remove them to safety in drawer number three. Occasionally, you’ll have to do it though as the amount of material in drawer two can build up quickly.
Dust off the outside of the tower and put it back in its place of safety.
What the Frass?
‘Frass’ is the term for the powdery grey dust that accumulate in the bottom of the drawers and falls through with the eggs from the Beetle Drawer.
Frass is composed of a number of materials including beetle and larvae wastes, chewed up bran, dust from the bran and exoskeletons from moults and deaths. It can smell a little of ammonia or urine because of the nitrogenous materials in the waste products.

Using frass in your garden.
Frass is a useful garden additive. The nitrogenous materials feed soil microbes and plants. The exoskeletons and body parts are rich in chitin. When plants come into contact with chitinous materials they increase their defenses. Maybe they think that they are in contact with a predatory insect that’s out for a bite of them? Chitin is also a primary food source for fungi and can stimulate their growth and health as they do their amazing work in our gardens.
To use it, just spread it lightly around. The frass will break down slowly through normal garden cycles and provide its benefits to the plants and critters that live there. A word warning though – stand upwind while you’re spreading it or spread the frass on a windless day.
Potential problems and a few tips.
There are only a few potential problems with this design.
- Larvae aren’t becoming pupae and pupae aren’t becoming beetles. This is common in the cold weather. Try and move your tower to somewhere where there is more warmth. A laundry is usually enough in Winter. The slowdown is a natural, seasonal thing so don’t worry too much in Autumn and Winter.
- Beetles chew through the mesh or the glue securing it and get into other layers. This can be a bugger and you’ll have to empty drawer number 1, clean it and reseal it. Pick the beetles out of drawer 2 as well. If you have plastic mesh, they’ll eat through that pretty quickly too.
- You are too slow with harvesting and mealworms pupate and beetles hatch in drawer 3. Pick out the beetles by hand and put them in drawer 1
- Mealworms hatch and grow in the Beetle drawer. Some eggs will hatch quickly and you won’t notice the larvae until they’re big enough to see with your naked eye. Just pick them out and put them in drawer 3.
- All of the vegetable scraps dry out. This can be a problem because they’re the source of moisture for all stages except the pupae. You will have to add more scraps or add them more frequently.
- The bran gets a green mold, especially on or near vegetable scraps. You will need to remove this by hand and remove old scraps more frequently.
- There is a urine or ammonia smell. This is because you’re not cleaning out your frass frequently enough. The frass is the wastes of the beetles and larvae.
- A thick layer of discarded exoskeletons forms on top of the bran. Scoop this out or blow it off into your garden. It’s normal because the larvae molt in several times in their life.
- There are a lot of dead beetles. If you’re maintaining your tower at least weekly, you’ll see a few dead beetles here and there. They only live for a short time.
- Moths are in the drawers. Pantry Moths are a pest and often come as eggs in the bran. Freeze your bran overnight and let it warm up again before putting it in the drawers. MAke sure that your tower is well covered with netting.
- The beetles are eating the egg carton. That’s normal. They are on the go , literally, 24/7, eating and reproducing.

There you go! You’re breeding Mealworms!
If you want more info, check out this page about the life cycle of Mealworms.