Hi friendly fungal foragers, bushwalkers and amateur mycologists!
Here’s a page about information, equipment and tips to make your mushrooming forays much more comfortable, fun and productive.
Some basic equipment –
For personal comfort and safety
Comfort and safety are two big concerns when you are out foraging. Comfort is very important, especially as you will, most likely, be wandering around a Pine forest on a chilly Winter’s morning. Take care of yourself with –
- A map if it’s a new location. Google Maps and some mobile services often don’t work in the depths of a forest. A compass can help too in this situation.
- Good shoes. Often the terrain will be damp or uneven, so waterproof, comfortable shoes are the go when mushrooming.
- Suitable clothing. Jackets and pants are a must most of the time, both for the weather and the terrain.
- A hat is essential, whatever the weather.
- Drinking Water. Even on chilly mornings, it is easy to get dehydrated when exerting yourself. On warmer days, this is equally true.
- Coffee, tea or soup. Something warm is a real treat. You can carry it with you or leave it in your car.
- Snacks.
- First aid kit. Doesn’t have to be elaborate, but scrapes and cuts are pretty common. Attending to them immediately helps with your health an comfort.
- Something to kneel on. Makes things more comfortable, especially in wet weather. Cold, wet knees are the worst!
- Rag for wiping hands and equipment.
- Water and soap or sanitiser for cleaning your hands and gear.
- A torch if you are going out early in the morning or expect to be out after dark. The Sun doesn’t reach some areas deep in a forest until late and leaves them early.
- Make sure that you keep track of your gear – it’s easy to misplace things in the forest and almost impossible to find them later.
For identifying and harvesting –
- Field guide.
- Hand lens for close up inspection. 10X magnification is fine for quick field ID.
- Hand or dental mirror for inspecting under the cap without removing the mushroom from its place in the soil.
- Knife for harvesting and dissecting specimens
- Camera for ID, general photography and selfies with your haul.
- Sketchbook for recording location, numbers, species, details
- Basket or bucket for carrying your haul.
- A separate container for potentially toxic specimens.
- Paper for making spore prints if you want to make them in the field.
Some tips for foraging and identifying your discoveries-
- Familiarise yourself with the location and terrain before you go out. Have a map or, at least, a sketch of the area. On the same note, check out landmarks and remember where you parked your vehicle.
- Familiarise yourself with the fungi you are likely to find. this applies to both edible nd non edible.
- Take lots of pics and make sketches of locations frequently. This helps if you get turned around in the bush. It also helps you remember where you found your prized fungi. Much of a forest looks pretty similar.
- Carry a basket or cloth bags for your finds. Plastic doesn’t breathe and the humidity and moisture that develops in it on a long forage can be detrimental to your mushrooms. Plastic bags and large plastic buckets are OK for immediate collection but the fungi should be transferred to something non-plastic as soon as possible after harvest.
- Clean your mushrooms as you pick them, it’s much easier than trying to clean them when you get home and all the dirt has worked its way into the gills.
- When placing the mushrooms in your basket, place them with the gills down. This stops dirt getting into the gills. If I’m picking a lot, I’ll even put a cloth in the basket every so often to make layers that are easier to keep clean.
- Don’t wash your mushrooms on site. They can absorb a lot of water and go mushy. If you have to wash your harvest, do so just before cooking so they don’t have time to absorb the water.
- Try to keep species separate. You don’t want to have a toxic mushroom in contact with those you will eat. Also, things like Slippery Jacks are, as their name suggests, slippery and slimy – this will transfer to your other mushrooms.
- Use a hand mirror to check for identifying features such as gill types that are under the cap without tearing out the mushroom.
- Wipe your hands and knife frequently to prevent possible toxins from transferring from the mushrooms you are identifying and those you are about to eat.
- Cut the stem of a mushroom rather then tear it out of the ground. This leaves the underground parts of the mycelial web (more about that in my upcoming post about mushroom ecology) intact. There is some controversy about this as research has shown that it makes no difference but I do it out of respect for the forest gods.
- Take lots of breaks, enjoy the location and don’t forget to look up! Much of the time, your eyes are fixed at ground level but the forest or bush has many beauties above this level too.
- If you are making spore prints in the field, take both black and white papers for highlighting different coloured spores. Don’t use any other coloured paper of the colour may confuse you.
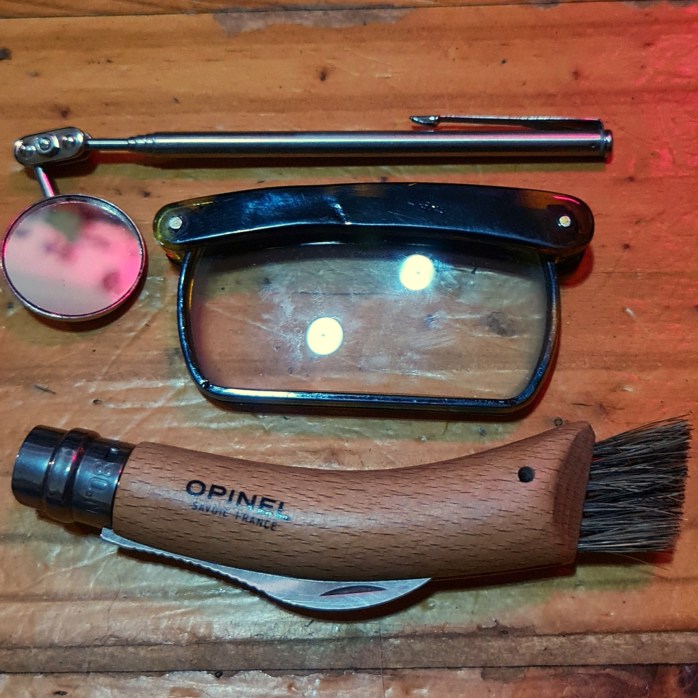
The mushrooming knife.
Much is said about there are special, dedicated mushrooming knives made by companies like Opinel (shameless plug for free merchandise) that have nice ergonomics and a built in badger hair brush for cleaning debris from your fungi. I actually prefer the straight bladed, foldable knife from Opinel and had one for years until I lost it at the beginning of last season. The very thin carbon steel blade worked a treat for cutting mushroom stems.You don’t need one though, any small, sharp knife will do, though don’t take your partner’s favourite kitchen knife in case you lose it (who did that?). Honestly, any relatively small, reasonably sharp knife will do the trick. Don’t take Jelina’s best paring knife though – I did that once. Enough said. I’ve lost a couple of knives in the undergrowth and found several more so losing them is easy.


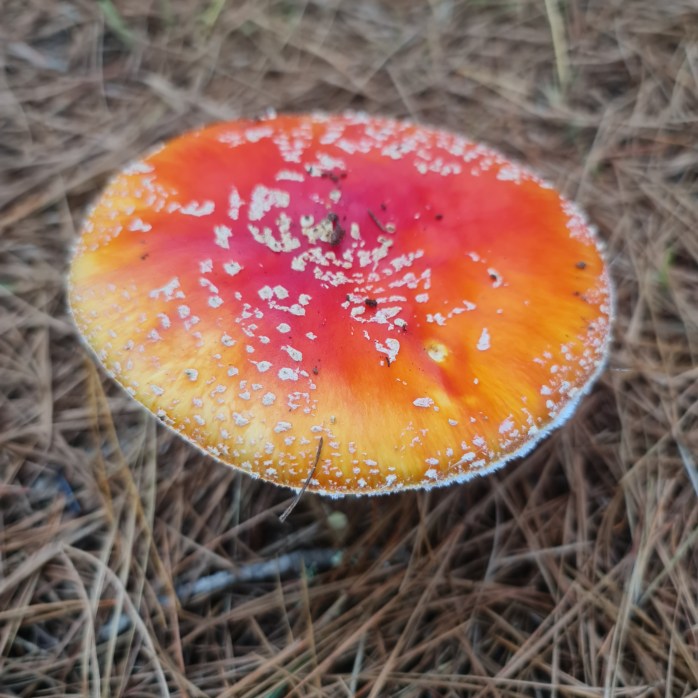
Taking the perfect fungus ID photograph
Taking pics of mushrooms in the field for ID purposes is an art in itself. However, there are some basic tips that should see you right.
- Make sure you get a location pic. Not only can these be scenic and pretty, they can help you find the location again if you include a few landmarks.
- Take a pic of the fungus in situ and, if gregarious (they like company), make sure you get a pic of the group.
- Include a known object, such as your mushrooming knife in at least one of the general pics.
- Include some of the substrate (what the fungus is growing on) in the pic.
- Take pics from the following angles – top view, side view of cap and stem, under the cap (to get the gills/pores/teeth).
- Take special pics of the margin of the cap, and the gills/pores/teeth.
- Take extra pics of the stem, particularly its base, where it joins the stem and of any ring around it (annulus).
- Cut the mushroom in half vertically to show the flesh in the cap and stem and whether the stem is hollow solid or fibrous.
- If spores have deposited on the substrate, get a pic of that to show spore colour.
- If you’ve the time and inclination, take a spore print and photograph that. You may want to wait til later if conditions aren’t comfortable.
- Take a selfie!
It may seem a lot of work but there’s nothing worse than getting home, cracking out the books and having one key detail missing!
Wow that was a lot of info! Most of it’s common sense and if you remember a lot of it, your fungal foraging foray will be more comfortable, productive and fun. Is there anything I’ve forgotten?